Mission Style Magazine Table
|
This information has been reprinted from a 1912 Popular Mechanics publication titled "Mission Furniture And How To Make It".
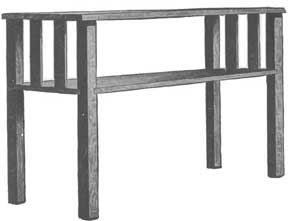
This little magazine table will be found a very useful piece of furniture for the den or library. Its small size permits it to be set anywhere in a room without being in the way. Quarter-sawed oak should be used in its construction, and the following pieces will be needed: 4 legs, 2 by 2 by 29 in., S-4-S. 4 end slats, 1/2 by 2 by 10 in., S-4-S. 1 shelf, 1 by 16 by 30 in., S-1-S. 1 top board, 1 by 18 by 36 in., S-1-S. If you are convenient to a planing mill you can secure these pieces ready cut to length, squared and sanded. This will save you considerable labor. The four legs are finished on all sides and chamfered at the bottom to prevent the corners from splitting. The mortises for the shelf should be cut 9 in. from the top of each leg, as shown in the sketch. Care should be taken to make these a perfect fit. The shelf should be finished on the top side and the four edges, and the corners cut out to fit the mortises in the table legs. An enlarged view of this joint is shown in the sketch. The top board may have to be made of two 9-in. boards, dove-tailed and glued together. It should be finished on the top side and the edges. The edges can be beveled if desired. The board is fastened to the legs by means of screws through four small brass angles. These angles can be made or they can be purchased at any hardware store. The top board and the shelf should be mortised at each end for the 1/2 by 2-in. slats. These slats should be finished on all sides. The table is now ready to be assembled and glued together. The glue should dry at least 24 hours before the clamps are removed. After the glue is dry, carefully go over the entire table with fine sandpaper and remove all surplus glue and rough spots. It can now be finished in any one of the mission stains which are supplied by the trade for this purpose. |


