Mission Style Table and Chairs
|
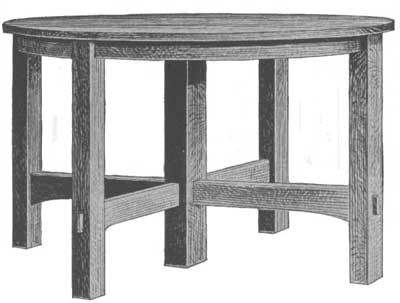
This information has been reprinted from a 1912 Popular Mechanics publication titled "Mission Furniture And How To Make It". Extendable Table
This extension table should be made of some hard wood, preferably white oak. It will be a difficult matter to secure legs of the sizes indicated in solid pieces of clear stock. It will be possible, however, to secure them veneered upon white-pine cores. If the veneering is properly done these will serve the purpose very well, the lighter weight, due to the white-pine core, being an advantage. The circular facing is best made by first sawing a segment of the circle of the size wanted and then veneering the outer surface of this. Order the following stock:
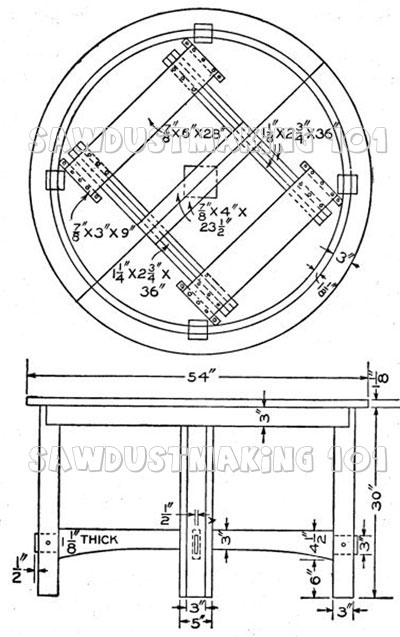
There are various ways of arranging the slides to work one with the other. Several patented devices are on the market that permit a ready adjustment with but little effort and are used extensively by commercial manufacturers. The amateur will do well to secure a set before he undertakes to work these slides to shape.
Prepare the legs by cutting them to length. Lay out and work the mortises. The ends of the facings are to be tenoned and housed into the posts. Prepare the rails by cutting the tenons and shaping the lower edges as shown in the drawing. Prepare the top. After this, assemble this much of the frame, using plenty of clamps and good hot glue. Next get the under frame and the slides ready and attach them as shown. There will be needed plenty of glue blocks for reinforcing the facing where it is fastened to the top, etc. For a finish, apply a filler colored, as desired. Upon this, after it has hardened and been sanded with No. 00 paper, apply a coat of shellac. Upon the shellac apply successively several coats of some good rubbing varnish. Rub the first coats with haircloth and the final coat with pulverized pumice and crude or linseed oil. If an effect is wanted that will contrast, stain the wood first with a water stain. Sand this lightly when dry, then apply a second coat of stain diluted one-half with water. Again sand and then apply a thin coat of shellac. Sand this lightly, and apply the filler and the varnish as described above.
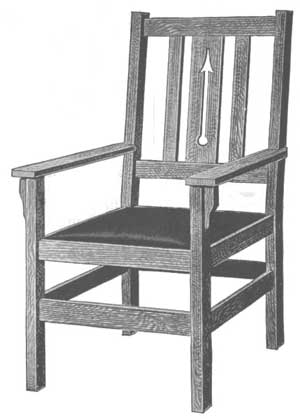
Arm Dining Chair
This armchair will look well if made of plain-sawed oak. Quarter-sawed oak might be used, or black walnut if desired. The stock bill specifies the various parts mill-planed to size as far as possible. If some amateur craftsman should prefer to [80]do his own surfacing, thereby saving somewhat on the expense, he should add 1/4 in. to the width of each piece, providing the stock is mill-planed to thickness. It is hardly profitable to get stock entirely in the rough if the work is to be done by hand. The following is the stock bill:
The design shown is for a chair in which the width of front and back is the same. Also the back leg parallels the front below the seat. In commercial practice the backs are usually made somewhat narrower than the fronts and the back leg is slanted somewhat below the seat as well as above. As this construction necessitates sloping shoulders on all tenons it complicates the problem when the work is not done by machinery. The ambitious amateur may readily get the proportion of slant by measuring common chairs. For mission effects the chair looks well with front and back the same width. Prepare the front posts first and then the rear. The rear posts are to be cut from the single piece of stock specified. By proper planning both pieces may be gotten out without trouble. Lay off and cut the mortises. Saw the rails to length and lay out and cut the tenons. The back rails are to have mortises in their edges to receive the ends of the slats. Instead of [81] tenoning these slats make mortises large enough to receive the whole end—in other words, house the ends. Shape the two arms, then glue up the back and then the front of the chair. After the glue has set sufficiently, assemble the remainder of the parts. Thoroughly scrape and sandpaper the parts and then apply the finish. For a seat, either a leather cushion may be placed upon slats or the bottom may be upholstered in the usual manner, using webbing on heavy canvas, and then felt or hair with a top of canvas and leather; the whole being firmly fastened with tacks and the leather with ornamental nails. Side Chair
A companion piece to the chair with arms and the sideboard is the side chair illustrated herewith. It should be made of the same kind of wood and finished to correspond with the armchair. Order the following stock list:
Square up the front posts to length. From the single piece specified cut out the back posts, giving them the amount of slant indicated in the drawing. Set these four posts upright in the positions they are to occupy relative to one another in the finished piece, and mark off, as with penciled circles, the approximate locations of mortises. After this, lay them on the bench side by side, even the lower ends and locate accurately the ends of the mortises. Gauge their sides. Saw the rails to length and lay out the shoulder lines and the cheeks of the tenons and cut them. Plan to house the ends of the slats in the back rails. While the drawing shows a chair in which the front and back are of equal width, the amateur may make the back narrower if he so desires. A measurement of a common chair will give the proportions. Place the front and the back in the clamps and after the glue has had time to harden, assemble the remaining parts. Thoroughly scrape and sandpaper all the parts, carefully removing any surplus glue. Wood finish will not "take hold" where any glue has been allowed to remain. The seat may be given the same treatment as suggested for the armchair. This should not be done, however, until the finish has been applied. A simple finish is obtained by the application of a coat of paste filler of a soft brown color, if oak has been used. Apply and clean this off in the manner directed by the manufacturers and after it has had 24 hours in which to harden, sand it lightly with No. 00 paper. Over this apply a thin coat of shellac. Allow this to harden, then sandpaper lightly with fine paper. Upon the shellac apply several coats of some good rubbing wax. Follow the directions that are to be found upon the cans, being careful not to apply too much at a time. If too much wax is applied, it stays in the small pores of the wood and produces an ugly chalk-like appearance. |
||||||||