Mission Style Plant Stand
|
This information has been
reprinted from a 1912 Popular Mechanics publication
titled
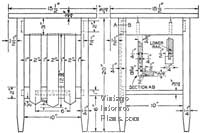
For the mission plant stand shown in the illustration secure the following list of quarter-sawed white-oak stock, cut and finished to size:
Test all surfaces of the posts with a try-square to see that they are square with each other. Lay out the tenons on the ends of the rails as shown in the sketch and cut with a tenon saw and chisel. Arrange the posts and rails as they are to stand and number each tenon and mortise. Lay out the mortises in the legs, taking the measurements directly from the tenon which is to fit that mortise. Cut the mortises, first having bored to the depth with a 1/4-in. bit. The slats should now be made and mortised into the top rail 1/4 in. They come outside of the lower rail and are held to it with two small brads, fancy-headed tacks, or round-head screws. In laying out the mortises for the lower rails, care must be taken to have them set 1/8 in. farther in than the upper rails so the slats may come outside. Set up the stand without glue or screws to see that all pieces fit accurately. Then glue up the sides with the slats first. After these have set for 24 hours, fit in the other two rails and the shelf. Three flat-head screws should be used to hold the shelf in place. These must be placed so the slats will cover them when they are attached. When this work is completed it is ready for the top. A good method of attaching the top is shown in the sketch. The screws used for fastening should be 2-in. No. 10. Bore into the rail 1-1/2 in. with a bit 1/16 in. larger than the head of the screw. Then bore through the rest of the way with a bit a little larger than the shank of the screw. Thus a little space is left for expansion and shrinkage of the top. Scrape and sandpaper thoroughly to remove all marks or glue spots. Finish with two coats of weathered-oak stain, followed by two coats of black wax. |