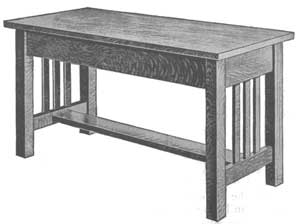
Mission Style Piano Bench
|
The piano bench shown in the accompanying picture was made of black walnut and was finished natural. The finish was applied in the following manner: First, all the parts were well scraped and sandpapered, then the surface was covered with a coating of boiled linseed oil. After this had stood several hours, or until it had had time to penetrate the wood, the surplus liquid was wiped off with a flannel cloth. After the oil had stood for 48 hours, a thin coat of shellac was applied and allowed to harden overnight. The next morning this shellac was sandpapered lightly with No. 00 paper and a coat of floor wax was applied according to the directions which are found upon every can. Two more coats of wax were applied after intervals of half an hour and the finish was completed. The effect is very pleasing. The oil brings out the rich color of the wood and the shellac and wax serve to preserve the color. The following stock is needed:
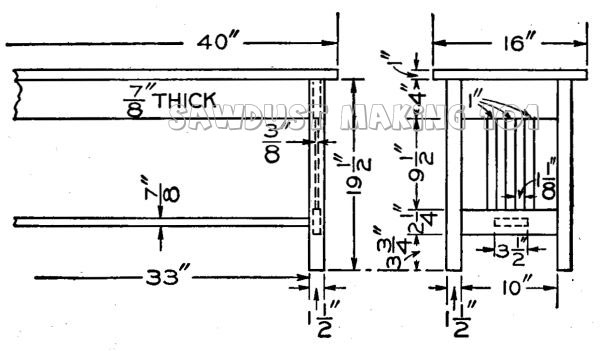
With the exception of the legs all the stock is specified mill-planed to thickness upon two surfaces. The legs are specified planed on four sides. Square the legs to length and the rails, stretcher, slats, etc., to width and length. Lay out and work the tenons of the rails and stretcher. The slats are best made without tenons, the whole end of each slat being "housed" into the rails. The reason for this is obvious—it is a difficult matter to fit two or more pieces between fixed parts when their ends are tenoned. When the ends are housed any slight variation in the lengths adjusts itself. It is necessary, however, to chisel the sides of the mortises carefully, but this is a simple matter compared with getting the shoulders of the tenons, etc., all just alike. Assemble the parts, using good hot glue. Put the ends of the bench together first. When the glue has hardened on these, place the stretcher and side rails. Fasten the top to the frame from the under side, either by glued blocks and screws or by angle irons.
|