Mission Style Chafing-Dish Buffet
|
The chafing-dish buffet is something very convenient and attractive for the dining room. For the best effect it should be made of quartered oak, stained brown or weathered and trimmed with brass hardware. To save a great deal of uninteresting labor, secure the following pieces of stock, surfaced on four sides and cut to length:
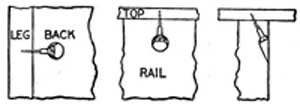
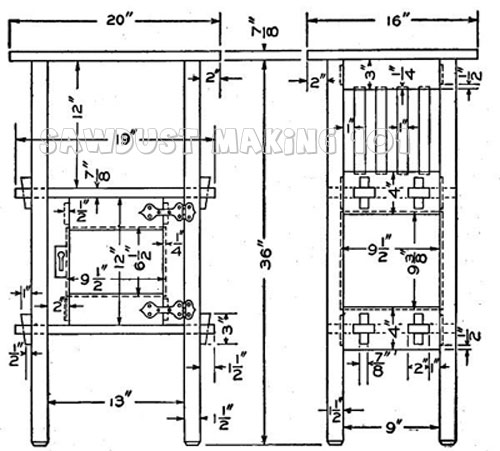
Begin the work on the rails for the sides of the stand. Have them all squared up to exactly the same length and to the correct width and thickness. Mark the tenons on the ends of each and cut them with a saw and chisel. When this is finished, try the legs to see that they are all the same length and that their surfaces are square with each other. Next mark the mortises in the legs for the tenons of the rails. To make the mortises, first bore to depth with a bit 1/8 in, smaller than the width of the mortise and cut to the line with a chisel.
Before gluing up the sides, cut the mortises in two lower rails for the tenons on the ends of the shelves. These tenons, with the smaller mortises in them for the keys, should be cut first. Square up the two side panels and cut grooves 3/8 in. wide and 1/4 in. deep for them in the rails and part of the legs. Make the eight slats 8 in. long, 1 in. wide and 3/8 in. thick, and cut mortises for them in the two upper rails. The two sides of the buffet are now ready to be glued up and clamped. While the glue on these is setting, make the door. The rails are mortised into the stiles 1/2 in. and both are grooved to receive the panel. It is best to get the stock a little full for the door so that it may be made up a little larger than necessary and planed down to fit. There only remains to fit in the shelves and fasten the top and back. The top and back are held with screws as shown in sketch. Taper the keys only slightly, otherwise they will keep working loose. Stain with two coats of weathered oak, give one coat of thin shellac to fix the stain and two coats of wax for a soft-gloss finish. |